
 |
| This is a scarf I made with Sashay(Waltz). I made this by doing rows of 5 SC, but picking up every other loop. Skipping a loop, made it more full and I still got a nice length with only one ball. I timed myself to see how quick it really is to make a scarf with this yarn, it took 2hrs and 13 min., pretty fast! |
 |
| I made this scarf with Sashay(Jive). This scarf was made by knitting rows of 6. This time I picked up and knitted every loop across the top of the yarn, rather than every other. The ruffles were less dense and I was able to get a longer scarf from one ball, making a long skinny scarf. This scarf was 21 inches longer than the above crocheted one, and still only took me 3 hrs and 17 min to knit, not bad! |
 |
| This is the the finished scarf, that I mentioned in my last post that I was working on. This one is not Sashay, it is Premier Yarns Starbella. It is similar to Sashay, except the loops of the netting are bigger, but it is used in the same way, by knitting or crocheting the loops across the top of the material. I spent another 30 minutes, working the rest of the ball, and finished this scarf. It has a nice fun look, and I love the bright colors that Starbella has to offer. |
After Making the scarves, I decided to do some experimenting. I love to play with texture and stitches, some of my best project ideas have come from doing just that! These are some of the other things I came up with using this self ruffling yarn.
 |
| Knitting every row with this yarn causes the ruffles to go in a spiral pattern, so I wanted to see the effect if worked in Stockinette stitch (knit 1 row, purl 1 row and repeat). The result was this really cool material, with one flat side that shows the V's of Stockinette and one ruffled side, where the ruffles lay in a zig zag pattern rather than spiraled. |
 |
| Red Heart had instructions for making a bloom by first crocheting a base and then making a chain of Sashay and sewing it in a spiral pattern onto the base. This is the what my bloom looks like, front and back following their instruction. It was pretty quick to make, nice and full and had a base which makes it easy to attach to a garment or pin. |

 |
| These are some flowers I made by crocheting 2 rows of Sashay in the round. The blue one is a small flower attached to a hairpin. I found that if I folded the Sashay in half and picked up both layers of loops just below the fold I was able to easily make a mini flower. These flowers only took minutes to make! |
 |
| Sashay yarn worked into a knitted swatch. |
 |
| Sashay yarn worked into a crocheted swatch. |
I could see this yarn being used in other craft projects besides knitting and crochet. I thought it might be ideal to use to add ruffle trim to sewing projects and paper craft projects such as card making. I ran out of time before my demo to make up any sewing samples, but I did manage to whip together this little butterfly that I thought would make a cute card.
 |
| To make this card, I cut a length of Sashay yarn and folded it inward, so the ends meet in the middle. Next I secured the ends in place and cinched the center by wrapping some thread around the middle and tying a knot. After making the simple bow with Sashay, I took some black yarn and made a butterfly body by making a short crocheted chain, turning and working a SC in each chain. The beginning tail and ending tail ended up on the same end so I trimmed them and left them to use as butterfly antennas. I glued the pieces to a piece of card stock. From start to finish it took me about 10 minutes to make, plus drying time for the glue. Pretty quick and easy. |
 |
| This is me at my Demo table modeling my scarf and matching flower hairpin I made. |
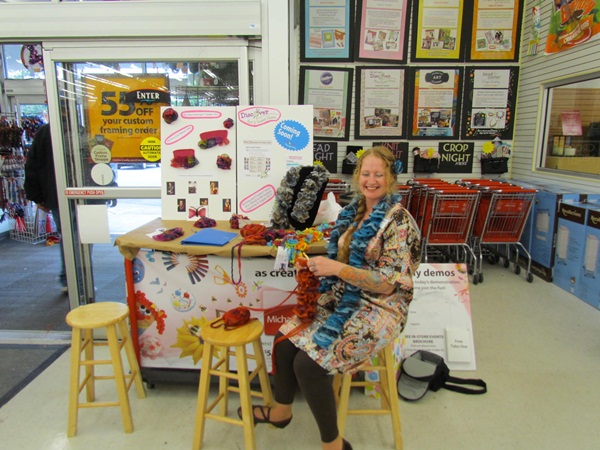 |
| This is me Demonstrating How I made the crocheted Sashay Scarf. |
I'm glad to see that are more things to do with Sashay than scarves. I especially like the roses.
ReplyDeletelove your ideas!! thanks for so many detailed pics.
ReplyDeleteThank you! So glad you liked my post, thanks for visiting my blog!
DeleteGot the same idea as you for the roses. Same technique could be used to make a millenial version of the 1960's big fake fur hats. I haven't tried knitting with it yet. Did you have to do anything special with the stockingette to get the ruffles all to one side of the work? (Crocheting it flat requires keeping the yarn at the front of the work on alternate rows.)
ReplyDeleteNo, I didn't do anything special to get the ruffles on one side, it just works up like that. Thanks for the tip about using the technique for hats, that is a great idea!
Deletehow did you make the flowers exactly . I love those .
ReplyDeleteThanks Carrie! You can make the flowers a couple of different ways. You can use a coordinating color 4 ply yarn and crochet a base circle and then sew the sashay yarn in a circular pattern onto the crocheted circle. The other way to make a flower, my preferred method, is to simply crochet the sashay yarn in the round, picking up the existing loops across the top of the sashay yarn. To make a simple crochet circle you chain 2, then 6SC in second chain from hook, place stitch marker, then 2 SC in each SC around, next round *1SC in first SC, 2 SC in next SC* repeat around, next round 1 SC in next 2 SC, then 2SC in next SC* repeat. You just continue this kind of pattern until the flower is the size you want.
DeleteThanks for this! <3
DeleteI'd love to find some other uses for these yarns. I'm scouring the internet for ideas... Please let me know if anyone comes up with anything. I'm thinking pillows...
ReplyDeleteLook on pinterest there is a pin for a Sasha ruffle pillow.
DeleteHi, I have been crocheting sashay scarves but, I like the thick ruffle look not long and skinny. Would knitting do that? If so what "pattern" (rows stitches etc.) should I do?? thanks!!!!!!
ReplyDeleteJust found your blog and I was wondering if it was possible to knit instead of crochet the flowers.
ReplyDeleteI think that would definitely be possible. The easiest way to knit them would be in the round using the magic loop method. You would pick up the loops at the top of the Sashay yarn and those would be your cast on stitches, then knit in the round. Joining might be a little tricky because of the cumbersome nature of the yarn but if you treat the loops at the top of the yarn as your wraps it could definitely be done.
DeleteYeah, I was thinking it might be harder with knitting! Might give it a try, thank you!
ReplyDeleteHi I was wondering if you had pictures of the steps to make a flower. I see you wrote them out but I'm a type of person who gets things by pictures???
ReplyDeleteI have made the scarf several times. However, when I set them down, they unravel. Can you help me?
ReplyDelete