Tuesday, July 31, 2012

Not your Granny's Squares :)

What have I been making?  Granny Squares!  I am going to be teaching a class on Granny Squares in September, so I have been making some class project samples.  I love making Granny Squares, because they are easier than you might think, they work up quickly, and you can make just about anything with them. Of course there is the obvious Granny Square project, a blanket/throw; but you can also sew them together to make sweaters, scarves, market bags, pillow cases, hats, and the list goes on.  The projects for my class will be a market bag and/or a scarf.  Once you understand the basic principles of making a Granny Square, you can easily customize them to fit your needs.  The other great thing about Granny Squares is that they are small and make for the perfect project to carry with you.  

I am making these squares using Vanna's Choice yarn.  I plan to sew them together to make a scarf, which will be a sample for my class.


I chose the colors that I did, so that I could also use my scarf as an accessory to go with this skirt :)  I think I  might join the squares using rows of single crochet and black yarn, in order to match the skirt colors.


Sunday, July 29, 2012

Bunny Hat and Piano, life is good!


I just had to share this picture!  So, I come around the corner and there is my youngest daughter, Simone, playing the piano in her jammies and her bunny hat, that I made for her last winter! It made me laugh, so I had to share this! I am a big fan of Bob's Burgers and it reminded me of the little girl on there that is always wearing bunny ears :P
My daughters are such a huge source of motivation and inspiration for me.  They remind me of what it was like to be a kid.  They are so free, energetic, and genuine in all that they do.  My girls help me to tap into those aspects of myself, that sometimes get lost when I am busy being a grown up.  I am so grateful to have them as a constant reminder of what is truly important in life, of the good things in life; I cherish these little moments and never want to forget them.  
As a parent, my goal is to teach my children all that I can in order to help them be successful in life, but, quite often, I am finding that they are the ones that teach me.  They have helped me to grow and become a better person, providing me with a fresh and new perspective.  Because everything is still so new to them, they often question the absurdities in life, that we adults just accept.   I expect them to listen to what I have to tell them, but I think that is reciprocal; I make it a point to really listen to what they have to say too.  They remind me that it is the little things, the journey, and not the end goal that is your life.  I love them more than any words could ever express, and when they are old enough to understand, I plan to thank them for all that they have done for me.  

Saturday, July 28, 2012

Here's what I have been Knitting and Crocheting lately!

Over the last few weeks I have been busy preparing class samples and making a display to promote my classes.  A few of the things on my display were things I already had, such as the children's hats and the Sashay scarves.  I was in Michaels yesterday promoting my classes and I brought Mini-Me to work with me!  I had fun meeting and chatting with some very nice people and I got some of them to take my business card and calendar.  All in all, I consider it to be a successful day!


Thursday, July 26, 2012

Mini Me got a make over!

A few years ago I made a Mini-Me, a puppet caricature of myself.  At the time I was really proud of her, but she was one of my first puppet likenesses and I have learned a lot since then.  Like most Artist when looking at their earlier work, I felt she could use some improvements, so I decided to give her a few upgrades.


This is her before picture:

I have also gotten a better camera since making her.  My new camera is so much better, what a difference in quality!
Unfortunately, I forgot to take a before picture with the good camera before refurbishing her, but you get the idea :)

The first thing I did to refurbish Mini Me was take off her glasses.  Although I often wear my glasses when I knit and crochet, I thought the glasses blocked her eyes and lashes.  Maybe later I will make her some thinner framed glasses.  The next thing I did was knit her a new top.  My earlier puppets where all crocheted, but after making a few, I found that I liked the look of a crocheted body with knitted clothes better.  The other reason I decided to make her a new shirt is because this one was a little too low cut and her boobs kept falling out.  I removed the lip and nose ring, since I had taken my own out a couple years ago.  And finally, I added stuffing to the boobs and head to give them a better shape.  I am very happy with her make over and have decided that she is going to work with me, so I made her a name badge too!  


I think Mini-Me looks better than ever and I can't wait to bring her to work with me tomorrow!  


Wednesday, July 25, 2012

Creativity in Knitting

I have been a busy girl; the creative juices have been flowing!  I haven't written a blog entry in a while, but I have added more content to my blog.  I have been busy preparing to begin my knitting and crochet classes in August.  My class schedule and information is now available, just click the 'classes' link at the top of the page.  I have been knitting and crocheting like crazy these last few weeks!  I wasn't even sure what I should share first, so I thought I would start with my most recent project, 'knitted creativity'.


I was trying to come up with a creative idea for my display to promote my classes.  I wanted to share with others why I love knitting and crochet, because the creative possibilities are endless.  For me, knitting is not just a way to make warm winter garments, it is a form of expression.  I love to use the numerous textures and colors that the yarns of today have to offer to express ideas and feelings; simply put, I love Yarn Art! Then it hit me, what better way to show that than to literally put 'creativity' into my knitted sample.

There are a few ways to go about adding letters to your knitting.  You can use duplicate stitch, waste canvas(like in my free tutorial), or you can use Stranded Knitting, like I did here.  You can also use a technique called Intarsia to add color and images to knitting.  Intarsia, is a technique where you can add blocks of contrast color by having a separate strand of color for each section, usually held on bobbins on the wrong side of the work.  As you knit along, you simply pick up the contrast color when you reach that section.  I opted to use stranded knitting for my project rather than Intarsia because my sections of contrast color are quite small and Intarsia works best if you have large blocks of alternating colors.  Perhaps if my letters were bigger and bolder I would have chose Intarsia.

Stranded Knitting can be a bit tricky, especially when doing letters, because the pattern of alternating colors is irregular.  In traditional Stranded knitting(Fair Isle), the pattern of alternating colors is usually repeated several times across a row.  Such as for this Cowl pattern (from the Discover Gifts Class curriculum at http://www.craftyarncouncil.com)


back and front view of Fair Isle technique

When the color pattern is repeated regularly the strands are carried more evenly across the back of the work, and not usually carried across more than two, maybe three stitches.  When using stranded knitting for letters, as I have done, the alternating colors are not in a regular pattern, across the work.  This makes the color work a little more tricky, but I love a good challenge!


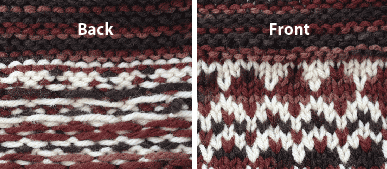
As you can see in the back of my swatch, there is a lot more white than the front, because I carried the White more often than the pink across the back.  I love the way stranded knitting looks on the wrong side too!  Stranded Knitting can be a bit time consuming, but I love to do it because I look at as a puzzle to be solved.  I started my project with this chart.


After I plotted my letters on my knitting chart, I followed the chart in a zig zag fashion, going from right to left on the knit side of my work and left to right on the purl side.  Stranded knitting is also easier to do when knitting in the round, because the strands are carried in the same direction as you work around.  When working on a flat piece you have to carry your strands up to the next row, so you have to be mindful to carry strands loosely as to not cinch the stitches.  I enjoy stranded knitting in the same way that crossword puzzle addicts enjoy word games.  I get great satisfaction from seeing my idea go from paper to yarn :)  Stranded Knitting, one of many techniques I use to express my "creativity" with yarn :)

Wednesday, July 11, 2012

My new Business Cards!!!


I Got My New Business Cards in the mail today!  Yayyyy!!! 

Knitted Sock Monkey Jumper and hat


A long time ago I was browsing on the internet and came across this sock monkey gown and thought that it would be really cute to make a sock monkey dress for a baby girl.  Recently a friend of mine happened to give birth to a beautiful baby girl and I knew she would love the sock monkey theme so I decided to make it!  The hat and jumper are my own design; the booties are made from a free pattern I found on tlc.howstuffworks.com.  Being that it is summer and a little to warm for knit wear,  I tried to make the outfit the size that I thought she would be this fall and winter.  Having two girls of my own, I know how fast babies can grow, so let's hope I guessed right on the size.

To get the sock monkey grey marl look, I knitted Bernat Satin's Grey Mist and Vanna's Glamour Diamond together.  The Vanna's Glamour gave it a subtle little sparkle, which I really liked!

I really liked how the twisted cable pleats turned out across the waist and bottom.   They were tight to work, but the result was nice!  I love to use seed stitch in projects because it adds such a nice texture, it also makes a beautiful edge, perfect for straps.  The trim and straps were made with Vanna's Choice Scarlet, one of my favorite reds to use because it is so bold and bright.

I had to add some bows and Sparkle(Vanna's Glamour) because I wanted it to be really girly!

I love to make these simple Mary Jane style booties!  They are so quick and easy to make and just adorable.  And of course very girly!!  I made these from Knit Picks CotLin, one of my favorite black yarns because the color is so rich.

Friday, July 6, 2012

My New Knitting Tattoo!!


I got a new Tattoo last night!!  It was done by my husband, Lonnie Moon, at Anvil Tattoo.  It is exactly what I wanted and I love it!!  

Monday, July 2, 2012

Red Heart Boutique Sashay Yarn Demo

On Saturday I did a Demo at Michaels Arts and Crafts in Burlington, WA.  It was a Demo of knitting and crocheting with Red Heart Boutique Sashay Yarn .  I spent the week prior playing with this fun craft yarn.  The thing that I loved most about this yarn is that some of the work is already done for you so it makes for quick and easy projects, that even a beginner can do.  The yarn is actually not your normal yarn, it is really strips of  a lace/net material that you can knit, crochet, or craft with.  I came up with a ton of ideas for this yarn, these are samples that I came up this last week.

This is a scarf I made with Sashay(Waltz).  I made this by doing rows of
5 SC, but picking up every other loop.  Skipping a loop, made it more full
and I still got a nice length with only one ball.   I timed myself to see how
quick it really is to make a scarf with this yarn, it took 2hrs and 13 min.,
pretty fast!

I made this scarf with Sashay(Jive).  This scarf was made by knitting
rows of 6.  This time I picked up and knitted every loop across the top
of  the yarn, rather than every other.  The ruffles were less dense and I
was able to get a longer scarf from one ball, making a long skinny scarf.
This scarf was 21 inches longer than the above crocheted one, and still
only took me 3 hrs and 17 min to knit, not bad!

This is the the finished scarf, that I mentioned in my last post that I
was working on.  This one is not Sashay, it is Premier Yarns Starbella.
It is similar to Sashay, except the loops of the netting are bigger, but
it is used in the same way, by knitting or crocheting the loops across
the top of the material.  I spent another 30 minutes, working the rest of
the ball, and finished this scarf.  It has a nice fun look, and I love the
bright colors that Starbella has to offer.

After Making the scarves, I decided to do some experimenting.  I love to play with texture and stitches, some of my best project ideas have come from doing just that!  These are some of the other things I came up with using this self ruffling yarn.

Knitting every row with this yarn causes the ruffles to go in a spiral pattern, so I wanted to see the effect if worked in
Stockinette stitch (knit 1 row, purl 1 row and repeat).  The result was this really cool material, with one flat side that shows the  V's of Stockinette and one ruffled side, where the ruffles lay in a zig zag pattern rather than spiraled.


Red Heart had instructions for making a bloom by first crocheting a base and then making a chain of Sashay and sewing it in a spiral pattern onto the base.  This is the what my bloom looks like, front and back following their instruction.  It was pretty quick to make, nice and full and had a base which makes it easy to attach to a garment or pin.

I thought it might be easier to make a bloom by just crocheting in the round Rather than making a base and sewing so I made this swatch by crocheting in the round.  I did rows of 12 SC in the round, making a swatch that is 6 SC wide when laid flat.  And it looked like flower to me and was a little quicker than making a base and sewing.


These are some flowers I made by crocheting 2 rows of  Sashay in the round.  The blue one is a small flower attached to a hairpin. I found that if I folded the Sashay in half and picked up both layers of loops just below the fold I was able to easily make a mini flower.  These flowers only took minutes to make!

This kind of self ruffling craft yarn is great for adding ruffles to a knit and crochet projects, so I made some swatches of that to see how it works.  I found the easiest way to work it in is to pick up a loop of Sashay, work the stitch with regular yarn as usual, then pass the Sashay loop over the stitch. 

Sashay yarn worked into a knitted swatch.

Sashay yarn worked into a crocheted swatch.


I could see this yarn being used in other craft projects besides knitting and crochet.  I thought it might be ideal to use to add ruffle trim to sewing projects and paper craft projects such as card making.  I ran out of time before my demo to make up any sewing samples, but I did manage to whip together this little butterfly that I thought would make a cute card.  

To make this card, I cut a length of Sashay yarn and folded it inward, so the ends meet in the middle.  Next I secured the ends in place and cinched the center by wrapping some thread around the middle and tying a knot.  After making the simple bow with Sashay, I took some black yarn and made a butterfly body by making a short crocheted chain, turning and working a SC in each chain.  The beginning tail and ending tail ended up on the same end so I trimmed them and left them to use as butterfly antennas.  I glued the pieces to a piece of card stock.   From start to finish it took me about 10 minutes to make, plus drying time for the glue.  Pretty quick and easy.

As you can see I had a lot of fun playing with Red Heart Boutique Sashay.  And I had a good time meeting some new people and sharing my projects at my Michaels Demo.

This is me at my Demo table modeling my scarf and matching flower hairpin I made.

This is me Demonstrating How I made the crocheted Sashay Scarf.

This was my first in store Demo at Michaels Arts and Crafts.  I had fun and look forward to the next one!