Monday, July 2, 2012

Red Heart Boutique Sashay Yarn Demo

On Saturday I did a Demo at Michaels Arts and Crafts in Burlington, WA.  It was a Demo of knitting and crocheting with Red Heart Boutique Sashay Yarn .  I spent the week prior playing with this fun craft yarn.  The thing that I loved most about this yarn is that some of the work is already done for you so it makes for quick and easy projects, that even a beginner can do.  The yarn is actually not your normal yarn, it is really strips of  a lace/net material that you can knit, crochet, or craft with.  I came up with a ton of ideas for this yarn, these are samples that I came up this last week.

This is a scarf I made with Sashay(Waltz).  I made this by doing rows of
5 SC, but picking up every other loop.  Skipping a loop, made it more full
and I still got a nice length with only one ball.   I timed myself to see how
quick it really is to make a scarf with this yarn, it took 2hrs and 13 min.,
pretty fast!

I made this scarf with Sashay(Jive).  This scarf was made by knitting
rows of 6.  This time I picked up and knitted every loop across the top
of  the yarn, rather than every other.  The ruffles were less dense and I
was able to get a longer scarf from one ball, making a long skinny scarf.
This scarf was 21 inches longer than the above crocheted one, and still
only took me 3 hrs and 17 min to knit, not bad!

This is the the finished scarf, that I mentioned in my last post that I
was working on.  This one is not Sashay, it is Premier Yarns Starbella.
It is similar to Sashay, except the loops of the netting are bigger, but
it is used in the same way, by knitting or crocheting the loops across
the top of the material.  I spent another 30 minutes, working the rest of
the ball, and finished this scarf.  It has a nice fun look, and I love the
bright colors that Starbella has to offer.

After Making the scarves, I decided to do some experimenting.  I love to play with texture and stitches, some of my best project ideas have come from doing just that!  These are some of the other things I came up with using this self ruffling yarn.

Knitting every row with this yarn causes the ruffles to go in a spiral pattern, so I wanted to see the effect if worked in
Stockinette stitch (knit 1 row, purl 1 row and repeat).  The result was this really cool material, with one flat side that shows the  V's of Stockinette and one ruffled side, where the ruffles lay in a zig zag pattern rather than spiraled.


Red Heart had instructions for making a bloom by first crocheting a base and then making a chain of Sashay and sewing it in a spiral pattern onto the base.  This is the what my bloom looks like, front and back following their instruction.  It was pretty quick to make, nice and full and had a base which makes it easy to attach to a garment or pin.

I thought it might be easier to make a bloom by just crocheting in the round Rather than making a base and sewing so I made this swatch by crocheting in the round.  I did rows of 12 SC in the round, making a swatch that is 6 SC wide when laid flat.  And it looked like flower to me and was a little quicker than making a base and sewing.


These are some flowers I made by crocheting 2 rows of  Sashay in the round.  The blue one is a small flower attached to a hairpin. I found that if I folded the Sashay in half and picked up both layers of loops just below the fold I was able to easily make a mini flower.  These flowers only took minutes to make!

This kind of self ruffling craft yarn is great for adding ruffles to a knit and crochet projects, so I made some swatches of that to see how it works.  I found the easiest way to work it in is to pick up a loop of Sashay, work the stitch with regular yarn as usual, then pass the Sashay loop over the stitch. 

Sashay yarn worked into a knitted swatch.

Sashay yarn worked into a crocheted swatch.


I could see this yarn being used in other craft projects besides knitting and crochet.  I thought it might be ideal to use to add ruffle trim to sewing projects and paper craft projects such as card making.  I ran out of time before my demo to make up any sewing samples, but I did manage to whip together this little butterfly that I thought would make a cute card.  

To make this card, I cut a length of Sashay yarn and folded it inward, so the ends meet in the middle.  Next I secured the ends in place and cinched the center by wrapping some thread around the middle and tying a knot.  After making the simple bow with Sashay, I took some black yarn and made a butterfly body by making a short crocheted chain, turning and working a SC in each chain.  The beginning tail and ending tail ended up on the same end so I trimmed them and left them to use as butterfly antennas.  I glued the pieces to a piece of card stock.   From start to finish it took me about 10 minutes to make, plus drying time for the glue.  Pretty quick and easy.

As you can see I had a lot of fun playing with Red Heart Boutique Sashay.  And I had a good time meeting some new people and sharing my projects at my Michaels Demo.

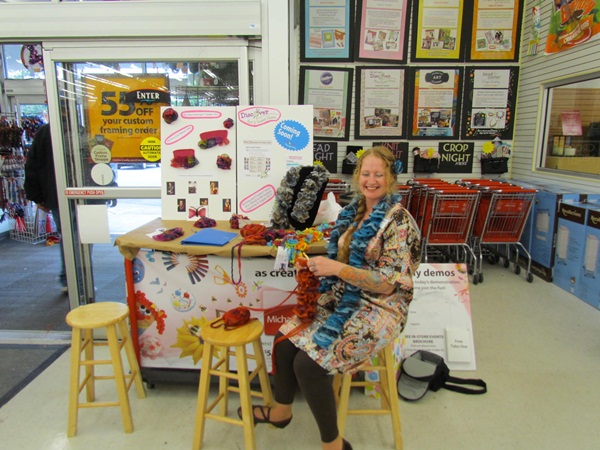
This is me at my Demo table modeling my scarf and matching flower hairpin I made.

This is me Demonstrating How I made the crocheted Sashay Scarf.

This was my first in store Demo at Michaels Arts and Crafts.  I had fun and look forward to the next one!


Wednesday, June 27, 2012

RED HEART Boutique Sashay yarn and other projects

I have been a busy girl!  I have had a lot on my needles lately!  Since my last post I have completed a gift for my friend, who just had a baby girl.  I will be sharing and posting about that project soon; I just sent the gift off in the mail today and I want to keep it a surprise.  In addition to that project I have started a top for myself that will go with an old skirt that I plan on embellishing with some crochet.

 Top I started knitting for myself.  I am using a great quick and easy free
tunic pattern I found on Lion brand  Yarns website.

I am going to embellish this skirt with crochet to match the tunic that I
 am making.  This is the Before picture; after picture will be posted soon.


Most recently, I was hired by Michaels Arts and Crafts in Burlington, WA and will be teaching Knitting and Crochet classes there, so I have been busy trying to organize and make samples for the classes I plan on offering.  Once I get my class schedule made up, I will be posting it here on my blog.
This Saturday I will be doing my first in store Demo, featuring Red Heart Boutique Sashay Yarn.  I am excited to do this Demo because I have come up with so many possible uses for this fun craft yarn.  I can see this yarn being a great embellishment for knitting and crochet projects alike.  I also think Boutique Sashay yarn would be great for other crafts as well, such as trim for sewing projects,  card making and paper crafts, re-fashioning clothing, flowers, and the list goes on. 
The in store Demo will specifically be of a Crocheted and Knitted version of a scarf made from this self ruffling yarn.  I have decided that I am going to try to make as many samples of possible uses as I can, in order to inspire crafters viewing my Demo.   Once I got used to managing the ruffles, the project worked up pretty quickly.  The progress shown in the photo below took less than 2 hours to crochet.
***Unfortunately in my haste, digging through the bin of yarn to choose my colors I did not realized that one of the balls I chose was Premier Yarns Starbella rather than Sashay.  So the photo below is actually of Starbella and not Sashay.  Thank goodness I shared this photo with my fellow instructors online and they made me aware of my mistake, I would have felt rather foolish calling this yarn by another name :P  The Structure of (and method for knitting and crocheting) the Sashay and Starbella is similar enough that I don't consider it a total loss, it was still good practice.

This is a scarf made from Premier Yarns Starbella.
It is amazing how quickly time flies when you are having fun!  I love experimenting and letting my creativity run wild!  Hopefully, I will have some Sashay yarn projects to share with you soon.


Friday, May 11, 2012

CYCA and swatching my way to a better me!

I have been a bad blogger lately, but I have a good excuse, I have been busy finishing my swatches for the Craft Yarn Councils Hand Knitting Instructors Program.  


My swatches are finally done and blocked.  I really took my time doing these swatches because I saw it as an opportunity, as with most things I make, to become better at my craft.  Although I am happy with my creations, there is always room for improvement.   I am a big fan of multitasking, so while making these swatches I experimented a lot with my knitting style in order to perfect those little things that I don't like about my knitting.  When making projects, I have learned how to hide or compensate for these little imperfections, such as hiding loose end stitches in my seams, using selvage edges, or making stitches more even by knitting in the round.  I feel like I have made some great progress upon completion of my swatches, but I am hoping that the Master Knitter that reviews my swatches will give me some pointers and useful feedback.  I have never had a more experienced Knitter critique my work before and I have to admit I am a little nervous, but excited for some direction.
The next things on my to-do list are writing my lesson plan for a beginner class and then actually teaching.   I have come up with a project, now I just need to write my plan.  Having never taught before, I am hoping to find some friends that would be kind enough to let me practice teaching them.  The program requires 15 hours of documented teaching time in order to receive your certificate.  I think my biggest obstacle when it comes to teaching will be keeping it fun and interesting.  I am passionate about knitting and all things yarn related and could probably go on and on about it, but I don't want to bore my students.  My hope is that my excitement about my beloved craft will be contagious and inspiring.  

Friday, April 13, 2012

Free Knitted Flower Pattern


Today I thought I would share with you how I made the knitted flower for this Monkey Hat.


Knitted Flower Pattern:

Tools:  you can use any size needles, keep in mind small needles make small flowers and big needles make big flowers.  (The sample was knitted with 4mm needles)  Also, for the petals it is easiest to use the magic loop method, for which you will need the longest circular needles you have.  The longer your circulars are the easier it will be.  If you are not familiar with the Magic Loop method for knitting small diameter tubes in the round, you can find lots of videos that demonstrate it on You Tube. You will also need a set of straight needles that are the same size as your circulars, a yarn needle for sewing, and Clothes Pin style stitch markers. 

Yarn:  Any yarn will work, keep in mind the heavier your yarn the bigger your flower will be. (The sample was knitted with Vanna's Glamor yarn and worsted weight yarn knitted together)

Abreviations: 
CO - cast on          st - stitch          K - knit          M1L - make one left        

K2tog  - Knit two together             BO - bind off  M1R - make one right

SSK - slip slip Knit                         ST - Stockinette

Petals: (make 5 petals)
CO 10 sts onto long circular needles and divide them evenly, so you have 5 sts on each needle. Leave a long tail for sewing your CO edge closed.  Join for knitting in the round.

R1:  K
R2:  *K2, M1L, K1, M1R, K2* Repeat 1x  = 14 sts
R3:  K
R4:  *K3, M1L, K1, M1R, K3* Repeat 1x  = 18 sts
R5:  K
R6:  *K2, SSK, K1, K2tog, K2* Repeat 1x = 14sts
R7:  K
R8:  *K1, SSK, K1, K2tog, K1*  Repeat 1x = 10
R9:  K
R10:  *SSK, K1, K2tog*  Repeat 1x = 6
R11: K

Sew the CO edge closed. Weave in all ends, including the tail of the live stitches (except you may want to leave a long tail on the last petal for sewing later) Use clothes pin style stitch markers to secure the live stitches while you turn your petal right side out.  I used one marker for 3 stitches on each side.  Place the live stitches of each petal on a holder or spare needle, alternating 1 stitch from each side of the petal.


 Flower Center:
CO 10 sts onto straight needles
K 15 rows in ST st
BO
cut yarn, leaving a very long tail
string tail through all edge sts
pull tail tight, forming a ball,
tie off, leave tail for sewing to flower.


Finishing:
With either the long tail of the last petal or a separate long strand of yarn, string the live stitches of the petals.

Pull Strand tight, bunching the base of the petals together.

Tie off and weave in end.

sew flower center to flower.

And that's it!  You now have a flower!  You can easily change the size and look of this basic flower to match any garment you are embellishing by choosing different yarn, stitch pattern, or needle size.  And, because the petals are thick and have two right sides, these flowers can also stand alone by simply adding a stem.  Another great use for knitted flowers is as decoration for gift wrapping, hair bands, etc.  


Saturday, April 7, 2012

The most meaningful handmade gift

I was browsing Facebook and I came across a question posed by Lion Brand Yarn Company.  They asked their fans, "What is the most meaningful handmade gift you have ever given or received?"   


Here is my answer to the question:


The most meaningful handmade gift that I have ever had the opportunity to give was something I had made for an amazing young artist whose life was unfairly cut short. Kayleen was 25 years old when she lost her 6 year long battle with cancer. A few months before she passed away, before we knew the finality of her diagnosis, my husband and I went to visit her in the hospital. I was heartbroken upon leaving her that day, not just for her and those around her, but because she was a talented soul slipping through our fingers and there was nothing that anyone could do but wait. My thoughts led me to a drawing she had done of a group of playful Baby Dragons. I was impressed by this drawing; inspired by her usage of color and her ability to give unique personalities to each one of these adorable little creatures borne from her own imagination. I remembered that the caption she had written to go with her artwork had said that she had an affinity for fat little creatures, especially Baby Dragons. I decided to crochet dolls of her Dragons, studying every detail to get them to match as exactly as I could. My goal was to make her drawing come to life. By the time I finished Kayleen was having fewer good days, so I sent them with her immediate family members to give to her. Later, I got a phone call telling me that Kayleen loved them and began shedding tears of joy and gratitude upon receiving them, as she had understood the compliment that they were meant to be. I was told that she had been having a rough go of it that day but it was turned around for the better after receiving my gift; that she was energized and proceeded to have, what would be one of her last, joyful evenings with those closest to her. I was speechless when I heard this news, my eyes instantly welled up with tears. I feel honored and grateful to have played a small part in that special night and that I had the chance to let her know how much I appreciated her as an artist. It was her art that inspired mine. On Christmas Eve 2011, we suffered a great loss. Kayleen Mann was a beautiful young woman, a daughter, a sister, a friend, and a gifted artist.


I wanted to share my story because the person and the experience had a positive effect on my life and my art and I am forever grateful.  To read the many other wonderful stories that others have shared or to share your own story go to Lion Brand Yarn's Story Contest page .


Sunday, March 25, 2012

Embroidering Hand Knitted and Crocheted Projects

When I make gifts for people I like to personalize them as much as possible.  One easy way to personalize a knit or crochet project is with embroidery. My two favorite embroidery techniques are Duplicate Stitch and using Waste Canvas.

Duplicate Stitch :
The simplest way to embroider Stockinette Stitch is with duplicate stitch.

I used duplicate stitch to embroider the word "Anvil" on this hat.  There are many videos on You Tube that demonstrate this technique quite nicely.  For duplicate stitch, you simply trace the existing stitches of the knitted material with a contrasting color so that the the embroidered stitches sit on top of the knitting and blend in with the stockinette fabric.  I used regular graph paper to plot out my letters, You have to keep in mind that the stitches are not exactly the same size and shape of the squares on your graph paper so your design will look a little different from what is on the paper.  

This is my messy worksheet, it isn't the prettiest of work, but it got the job done :P  

Notice the letters on the paper are a different size and shape than what is on the hat.  There is special graph paper you can get that is specifically for knitters, where the squares are more true to the shape of the stitches, but regular graph paper will work as long as your stitch count matches and you keep in mind the image will look a little distorted compared to what it looks like on paper.  The embroidery will look like part of the knitting for the most part,  except the embroidery stitches will be slightly raised, which is an effect that is very fitting for many projects.

Duplicate stitch is ideal for fitted garments, like hats, because the elasticity of the fabric is not noticeably compromised, the hat will keep it's stretchiness and still fit well.  I will often stretch the fabric as I go to ensure that the embroidered stitches are not to tight and stretch along with the fabric.  Another thing to keep in mind when doing this stitch is that you do not want to carry your yarn more than 1 or 2 stitches across the back of the work, as this will also affect the way the garment fits.  For the Anvil hat, the letters were 2 stitches apart and I used a separate strand of yarn for each letter.  Not carrying your yarn very far will mean more dreaded tails to weave in.  Most knitters, including myself, do not look forward to weaving in tails, but if it assures that the garment will fit well, then it is worth the extra work.

Embroidering with Waste Canvas :

Waste Canvas is one of those things that I wished I had discovered sooner, because I love to use it and use it often on both hand knitted and crocheted material.  When I first attempted to embroider something on my knitting and crochet using stitches other than duplicate stitch I was not happy with the results.  I found that my lines were not straight, sometimes the stitches would sink into the knitting and not be visible, and sometimes it was difficult to make the stitches even due to the stretchy nature of knitted fabrics.  I mentioned my frustrations to my sister-in-law, who is amazing when it comes to embroidery and Cross Stitch,  and she suggested I try Waste Canvas.  What wonderful advice!  

People who do Cross Stitch will often use Waste Canvas when stitching onto garments because it acts as a guide for their stitches.  I found that Waste Canvas was useful for embroidering on knitted and crocheted items for other reasons as well.  This special "temporary" canvas is made up of threads loosely woven together and then bound together with a mild glue.  The canvas provides a nice flat surface, making embroidery much easier, especially on stretchy Stockinette and Bumpy Crochet.  You simply attach the canvas with a basting stitch, embroider your design in any stitch you like, remove the basting stitches, and pull the threads of the canvas out with tweezers.  I found this method ideal for Knitting and Crochet because it does 2 very important things, it provides a flat smooth surface and it helps the embroidered stitches to stay on the surface, rather than sink in between the knitted stitches.  It also acts a spacer in that it creates just enough of a gap between the Knitting/Crochet and the embroidery so that the embroidery does not cause the knitting to buckle and bunch up; you get nice even stitches, not too tight and not too loose.  

These are some examples of embroidery that I have done on both crochet and knitting using Waste Canvas.  It works with both embroidery floss and yarn.  

Embroidery on crochet (on puppets that I made) using embroidery floss

Embroidery on knitting (a patch for a baby sized rocker jacket), with embroidery floss

Embroidered on Knitting with light weight yarn.

Also the baby rocker jacket.  The "Iron Maiden" is Floss, the "Led Zeppelin" is embroidered with white yarn.

Embroidery on the baby rocker jacket with Floss, made to look 'carved'.

Step by Step instructions for using Waste Canvas:

This is how I embroidered the Anvil on the Anvil hat.

1. Draw your design on paper.  Use a dark colored pen so you can easily see to trace the design onto the canvas.

2.  Cut a piece of canvas slightly larger than the image.  Be sure there is enough space between the edge of the canvas and the image so that you can attach it to your project with temporary basting stitches.

3.  Trace the design onto the center of the canvas.  If the design is really detailed, I will use a light table for this step, or I will only trace the main lines of the design and free hand the rest using the image as a guide.

4.  Pin the canvas in place.  I used an embroidery hoop, it is not necessary, but helpful to keep the rest of the garment out of the way.  If you use a hoop make sure you do not stretch the knitting tightly over it.  You want the fabric to be flat but not stretched, if it is tightly stretched your image may not land in the right place or the design will be bunched when you are done.

5.  With contrasting thread or yarn, sew the canvas in place with a temporary basting stitch, which will be removed later after embroidery is complete.

6.  Use thread or yarn to embroider your design.  I love to use whipped back stitch because it makes nice straight lines that sit neatly on top of the knitted surface, but any stitch will work with the canvas.

7.  After embroidery is finished, remove the basting stitches.

8.  With tweezers, begin removing the threads of the canvas.  This step can be a little tedious, especially in the beginning, but once you get going it will go quickly.  You can spray the canvas with water to loosen the threads, I don't usually wet it, but if you are having trouble getting started, wetting it may help.  I will begin by pulling all the threads around the edge of my design that are not sitting under the embroidery.  When you begin pulling the threads out from under the embroidery it may be helpful to hold the design flat so that the threads of the canvas sit straight, making it easier to pull out.

And that is it!  You now have a nice neat design that sits on top of your knitting, the canvas is gone!  
You can find Waste Canvas in the embroidery section of most Craft stores, including JoAnn's and Michaels.


Embroidery is a great way to add a personal touch to any project!    


Thursday, March 22, 2012

Knitted Animal Hats

Goodness, it has been a busy couple of weeks at our house!  We have recently adopted a lovable one and a half year old dog named Fritz and his cuteness as been quite distracting.

 Consequently, I have fallen way behind on my blogging.  I am still working on some tutorials for jazzing up and personalizing your knitted items, but in the meantime I thought I would share with you some animal hats I have been working on.


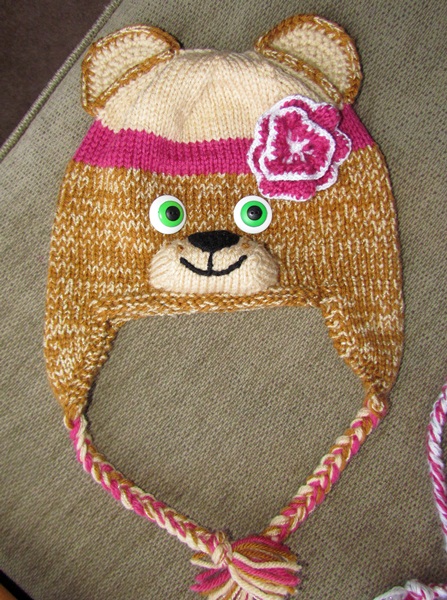
Inspiration for my designs often come from the children in my life and these hats are perfect example of that.  The Animal Hat Project began with the idea to make a monkey hat for a special little girl I know that recently celebrated her first birthday.  These animal hats are sock monkey inspired because the mother of the one year old that the monkey was made for told me a long time ago that she really liked the new-school sock monkey hats that she has seen lately, using  different colors besides the traditional sock monkey grey marl and red.

When my own children saw what I was making they asked if I could make them one too, but they wanted different animals.  This gave me the idea to use this as an opportunity to start working on a customizable animal hat pattern.  My plan is to write a pattern with many creative options.  The pattern will have six different animal options.  So far I have completed the first three animals.  Along with the monkey, rabbit, and bear,  I plan to have options in the pattern for an owl, tiger, and pig too.


This has been a really fun project to work on simply because I have let my creativity run wild.  I wanted these hats to be just as playful as the children who wear them, so I designed them to be bright and colorful.  The samples that I have completed so far have been made with little girls in mind, but my next sample will be the tiger and will show some boy options that will be included in the pattern.  
However, before I continue with writing this pattern I need to get focused and catch up on some of my homework for The CYC instructor program and TKGA master hand knitting program.   I only have a few swatches and assignments done, much less than I had hoped to get done by now.  As always, there is too much to do and never enough time to do it!